
In each muscle study, we’ll take a look at a muscle group, and examine what its purpose is in the body. Then using that information, we’ll take a look at a few ways to exercise the muscle and close with a sample workout that should effectively work the muscle. There may be some biological / technical jargon in this, but I’ll do my best to explain in plain English the terminology we’re throwing around as we go along!
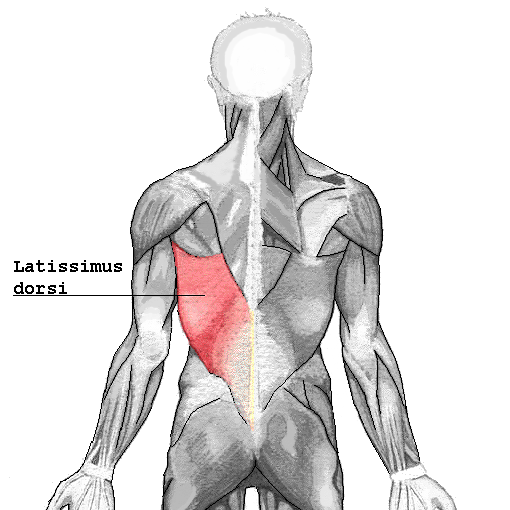
The latissimus dorsi (the lat) is one of the widest muscles in the body. The lats are a pair of singular, triangularly shaped muscles that run down either side of the back. The lats are a big part of what give a muscled male the stereotypical “V” shape a lot of us are after. The lats have numerous origin points along the lower back including the lumbrodorsal fascia, inferior thoracic and lumbar vertebrae, the sacrum, the illiac crest and four most inferior ribs. It runs across and up the back through the back and armpits and inserts on the upper, posterior (rear) side of the humerus bone of the upper arm.
The Lats are not commonly used in day to day activities, but are important when performing pulling exercises like the pull-up, chin-up or swimming. The primary function of the lats is the adduction (movement toward the center of the body) of the humerus toward the middle of the body. Secondarily, it also helps pull the humerus from front to back – seen if swinging the arms while walking, and lastly, to medially (internally) rotate the arm. To understand this last one, imagine holding your arms at your sides, now bend your right elbow 90 degrees, bringing the hand up and parallel to the floor. Now, bring the right hand over to touch the left elbow. What happens to the upper arm in this scenario is medial rotation. (fancy huh?)
So How Do We Best Work These Muscles?
By understanding how this muscle interacts with the body, we can begin to examine the best way to engage it in exercise for maximum effect. Let’s take a look at three different ways that will effectively help you to train this muscle, examine why they work, and how to properly perform them to best effect.
The 3-Step Pull-Up

The pull-up is a great exercise that primarily targets numerous muscle groups including the lats (which is why I picked it). Some people naturally seem to gravitate to pull-ups, and find them a fairly easy exercise to perform. Shamefully, I am not on of these people. Frankly, I hate the pull-up. it humbles me more than I want to be humbled, but with my whining out of the way, it’s a great exercise! Primarily it’s going to target your lats and biceps, but also your rhomboids, teres major, infraspinatus, pecs, erector spinae and external obliques. It’s the Swiss army knife of exercises. Since I suck at ’em, we’re going to talk about a few ways to do them.
Pro tip: you should be squeezing the bar TIGHTLY – pretend this thing owes you money and you’re not letting it get away!
1find a bar that’s high enough overhead that you can reach it, but if you bend your legs at the knees, you can hang from the bar at full extension with your feet (and knees) off the ground. Your hands should be fully gripping the bar with the fingers completely wrapped around the bar in an overhand grip (palms facing the bar, but not your body). The hands should be spaced slightly wider than shoulder width apart for a standard pull up – hands closer together means a harder pull-up, wider means an easier one. Exhale before pulling yourself up.
2Slowly begin to pull yourself upward toward the bar, inhaling as you do so. A few things should happen while executing the pulling:
- Initiate the pull by drawing the shoulders back and down, focus on squeezing the muscles in the back, attempting to draw the shoulder blades together. Once your shoulders are engaged, you should be able to switch the work to the arms and focus on keeping the lats squeezed (engaged).
- During the pull, try to keep the elbows close to the body (as opposed to flared out) your forearms should be parallel to your body.
- Pull your eyes past the bar, stopping once your chin is above the bar.
3Hold your position at the top of the pull for a 1 second count before lowering your body to the starting position. Rest for a mental count of 1 or 2 (this is your break) at the bottom and repeat the movement until failure (the point at which you cannot perform another movement, or you cannot perform another movement without sacrificing form).
A few variations to consider:
- Some people prefer not to return to a fully extended position at the end of the pull-up. this is certainly an option.
- Only consider “Kipping” to squeeze out 1 or 2 more pull-ups at the end. Kipping is kicking the legs to try to give you momentum to get back up the bar. It’s best not to kip, but it’s an acceptable cheat when you’re about out of gas and want one more before you stop.
- If pull-ups are too difficult, start with pull-up negatives. A negative involves a slight jump to get yourself up over the bar, but once there, lowering yourself as slowly as possible, as many times as possible. This will help strengthen the muscles involved so that you can perform pull-ups properly.
- Another alternate method is to perform a chin-up instead of a pull-up. A chin-up is the same movement, but the palms are facing you when you grab the bar in step 1. This position allows you to utilize the biceps more and makes for an easier pull-up.
The 3-Step Lat Pulldown

The lat pull down is – not surprisingly given the name – one of the best exercises to target the lats. They can be performed most effectively at a gym using a lat pulldown machine, but can also be performed at home using bands (just anchor the bands to a high position – like a pull-up bar and kneel to increase the tension). The lat pulldown will primarily target the lats, but secondarily the shoulders and core.
When performing the exercise, your shoulders should be back and down (pinching the shoulder blades together slightly) and the back should remain straight.
1Begin by sitting on the machine, many lat pulldown machines have a leg brace that your knees can slide under. Adjust this so that your legs are comfortable, but held firmly in place. Reach up and grasp the bar slightly wider than shoulder width, palms facing you. Inhale.
2Exhale while pulling the bar downward, your elbows should be pointed down during the movement (not flared out). Squeeze your lats during the exercise, one tip I saw recommended to imagine pulling from your armpits. Bring the bar to your chest.
3Inhale as you slowly return to the bar to the starting position, focusing on keeping the spine straight and the core engaged to control the movement. Repeat the movement until failure (the point at which you cannot perform another movement, or you cannot perform another movement without sacrificing form).
The 3-Step Bent Over One Arm Dumbbell Row

The One Arm Dumbbell row is a great way to isolate your lats, but it will also work the middle trapezius and rhomboids, biceps and erector spinae as well. For this, you’ll need access to a bench and a set of dumbbells.
1We’ll start with the right arm, to do this, you’ll want to stand next to the bench and place the left knee on the bench, bending over as you do so. Place the left hand on the bench to provide support in this bent over position. Grasp the dumbbell in your right hand, with the arm extended straight toward the floor, your right palm should be facing your body. Inhale.
2Exhale and slowly pull the weight upward toward the rib cage in a straight line, contracting the muscles in your back as you do so. The upper arm should stay close to the body, and engage your core to keep the torso steady during the pull. Try to focus on the back muscles doing the work to move the weight, and less so the arms.
3Lower the weight to the starting position in the same straight line you lifted it. Inhale while doing so. Repeat the movement until failure (the point at which you cannot perform another movement, or you cannot perform another movement without sacrificing form). Once complete, repeat this exercise using the opposite arm.
Stretch That Thing!
Strengthening the muscle isn’t good enough. You want a functional, strong, lean muscle that not only looks good, but that you can rely on. If you don’t stretch your muscles, you’ll begin developing range of motion issues that you don’t want. My rule of thumb – any time you work a muscle, you should also stretch the muscle. A few stretches you could perform after a lat workout might be:
Standing Overhead Reach
Child’s Pose
Wrap Up
There are many reasons to exercise this muscle group, ranging from functionality to simply aesthetic reasons. Hopefully this article sheds some light on the complexity of this muscle group, and increases your knowledge of how it’s used by your body. I’d love to hear your thoughts on ideas how you might be able to train it to work even harder.
Know someone who might like this article? Please share it with them, or via your social media network, it helps the blog out, and you never know who you might be responsible for motivating to live a healthier lifestyle!
Resources
