
In each muscle study, we’ll take a look at a muscle group, and examine what its purpose is in the body. Then using that information, we’ll take a look at a few ways to exercise the muscle and close with a sample workout that should effectively work the muscle. There may be some biological / technical jargon in this, but I’ll do my best to explain in plain English the terminology we’re throwing around as we go along!
The gluteal muscles – or “glutes” as they are most commonly known, is the name of the muscles that make up – well, your butt. This group consists of three total muscles: the gluteus maximus, gluteus medius and gluteus minimus, each lying atop the other.

The Gluteus Minimus
The gluteus minimus is the “lowest” muscle of the gluteals and sits beneath the Gluteus medius. It’s a small fan shaped muscle, with the wide end of the “fan” connecting to the pelvis, and the narrow end attaching to the top of the femur (the “thighbone”). The origin point of the muscle is the external surface of the illium on the pelvis and the insertion point is the top of the greater trochanter of the femur.
The Gluteus Medius
The gluteus medius sits atop the gluteus minimus, and is another fan shaped muscle also attaching to the pelvis and thighbone, but in slightly different places. This muscle’s origin point is the external surface of the illium on the pelvis – near the top of the bone and the insertion point is the lateral (side) surface of the greater trochanter of the femur.
The Gluteus Maximus
The gluteus maximus is the muscle that gives your butt it’s familiar shape. This is certainly aided by the two muscles sitting below the glute max, but the glute max is what is most visible as it sits atop the other two muscles. It’s origin point is the posterior aspect of the dorsal illium of the pelvis (just next to your lower tailbone, and the insertion point is the iliotibial band and the gluteal tuberosity on the posterior (back) femoral surface.
So What Do These Muscles Do?
The glutes connect the pelvis and femur together. As such, they work together to allow the hip joint to move in multiple ways. The glute minimus assists the glute medius with it’s muscle functions. The glute medius moves the leg toward and away from the center of the body and helps to rotate the thigh. The glute max aids with extension of the femur. In short, the glutes help with abduction and extension (pushing and pulling) as well as rotation of the upper leg.
Strong glutes act similarly to the hamstrings in that they allow you to create more force with the legs, translating into stronger kicks, or being able to run and walk faster and more efficiently.
So How Do We Best Work This Muscle Group?
Since the glutes affect movement of the hips, we can logically determine that anything that focusing on movements that involve the hip will place resistant stress on the muscles. It’s easy however to find movements that involve not only the hip, but the rest of the legs as well which may activate the glutes less effectively, so we’ll try to focus the suggested exercises below on movements that best target the glutes and minimize the help that the surrounding muscle groups will undoubtedly provide..
So let’s look at three different exercises we can do to target the muscle fully, examine why they work, and how to properly perform them to best effect.
The Glute Kickback

The glute kickback is named as one of THE best exercises to target your gluteus maximus. So if you’re looking for an exercise to help reshape your butt, this may be your new best friend! To make this even better, it requires no weights or special equipment, just what your mama gave ya! However, it is relatively easily adaptable to using a resistance band if you want to kick it up a notch (as shown in the photo above).
1The starting point of the exercise will be on all fours on the floor – in a crawling pose. Your hands should be dirctly underneath your shoulders, and your knees under your hips. Your head should be parallel to the floor – I find it helps to focus my gaze a few feet ahead of me on the floor. Extend your right leg straight back and inline with your body. Focus on keeping your hips in-line and avoiding a “sag” in your lower back.
2When ready, exhale as you push your right upward, foot toward the ceiling as high as you can. Focus on keeping movement originating from the glutes, not the leg. At the top of the movement, squeeze your glute to “pulse” your foot a little higher – this will be a subtle difference, not a big movement.
3In a controlled fashion, return your foot to the starting point, in-line with your body. Briefly rest at the bottom of the movement (a mental 2 count) and repeat the movement 5-10 times per set, each leg.
As mentioned, this movement can also be performed with a resistance band looped over the foot and held by the hands as shown in the example photo.
Single Leg Glute Bridge
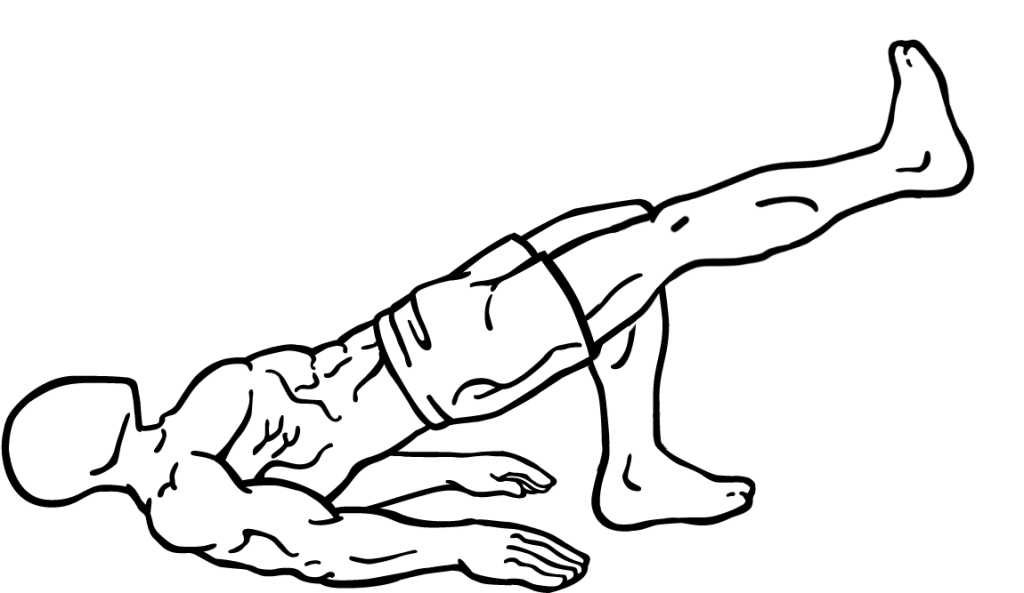
This one may look a little familiar from the hamstrings muscle study but we’re isolating the glutes a bit more by raising a leg of the ground. This will help us target all three glute muscles more effectively.
For this exercise, you wont need any weights or special equipment, but you can feel free to add a weight plate, dumbbell, kettle bell or med ball if you need an extra challenge! Just hold the extra weight against your abdomen while performing the movement. Your breathing can be fairly neutral throughout the movement, so inhale and exhale according to what feels natural.
1Lie down on the floor on your back with your arms at your sides, palms facing the floor (unless you’re holding a weight). bend your knees, and slide your feet up toward your butt – the closer your heels are to your butt, the easier this movement will be and the less you’ll feel it in your hamstrings – adjust to your fitness level. Your feet should be shoulder width apart. Extend one your right leg straight as illustrated above.
2 Keeping your core tight, raise your butt off the floor, forming a straight line from your shoulders to your knees. Hold this position for a mental count of 2 – this is your working position for the exercise. Squeeze (tighten) the glutes together, creating a slight upward thrust of the hips, while also squeezing the hamstrings to stabilize the body and hold for a 2 count.
3Relax the glutes and allow your hips to return to the working position as noted in step 2 (also shown in the picture!). Rest for a mental one second count and repeat the exercise for 20 seconds, lengthening the time of the set as your ability allows. Perform this exercise for each leg.
Once in the position described in step 2, your butt and extended leg should not touch the floor until you’re finished with the set and ready to switch to the other leg, or to take a break.
Lateral (Sideways) Stepping With Band
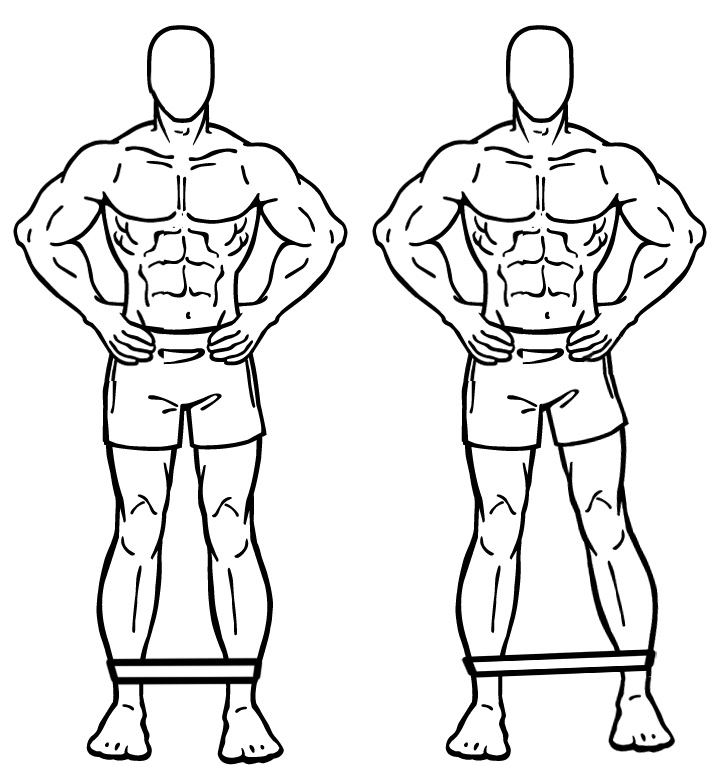
This is a fantastic little exercise that seems simple, but I guarantee that you’ll feel it in your glute medius, glute minimus and piriformis muscles if performed properly! You’ll just be doing some side to side steps for this one, but by adding tension, and adding it low on the leg, you’re increasing the effort it takes to make those steps, and forcing these muscles to do all the work.
1Place a short flat resistance band round the shins of each leg – just above the ankles – If you have hairy legs, or discomfort, consider wearing a sock that covers the area to keep the band from rubbing on your skin, or pulling on hair! Stand comfortably with the feet under your shoulders, and a slight bend in the knees. There should be a slight tension in the resistance band.
2Take a small step to your right with your right leg, leaving your left leg in place. This will increase the tension on the band – you should feel the effort in your hip / glute when you take this step as the muscles there stretch the band. Plant your right foot, and then step the same distance with your left foot, returning to starting position, except about 6-12 inches to your right.
3Repeat this stepping motion again for a total of 2 steps to the right, and then reverse the movement, stepping to the left, but leading with the left leg. Perform this movement for 30 seconds, followed by a 30 second break, 3-5 times. AS this becomes easier, increase the amount of work time.
Stretch That Thing!
Strengthening the muscle isn’t good enough. You want a functional, strong, lean muscle that not only looks good, but that you can rely on. If you don’t stretch your muscles, you’ll begin developing range of motion issues that you don’t want. My rule of thumb – any time you work a muscle, you should also stretch the muscle. A few stretches you could perform after a glute workout might be:
Piriformis Stretch
Hawaiian Squat
Both are similar movements, but each isolates the glutes a little bit differently / more intensely.
Wrap Up
There are many reasons to exercise this muscle group, ranging from functionality to simply aesthetic reasons. Hopefully this article sheds some light on the complexity of this muscle group, and increases your knowledge of how it’s used by your body. I’d love to hear your thoughts on ideas how you might be able to train it to work even harder.
Know someone who might like this article? Please share it with them, or via your social media network, it helps the blog out, and you never know who you might be responsible for motivating to live a healthier lifestyle!
Resources

I’ll definitely be trying those exercises. Thank you
LikeLike